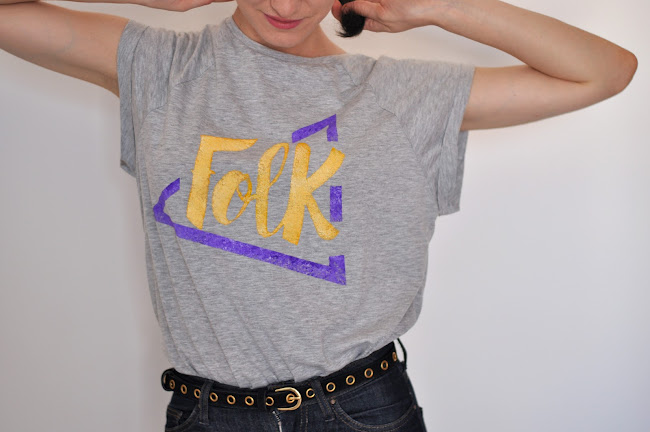
Plain T-shirts are very DIYables. There are lots of possibilities to transform then into great tops using many different techniques and, of course, a wide range of results. Sales are a great opportunity to purchase bargains to customize, that's why I've bought two plain T-shirts in grey (both are completely the same) and I'm going to create two different "designs" with them, so you can see the potencial of a simple basic garment like this. As I love DIY projects using paint, the first one is going to have some. Let's start with it!
Las camisetas lisas son muy customizables. Hay gran cantidad de posibilidades para transformarlas en bonitos tops usando distintas técnicas y, por supuesto, con gran variedad de resultados. Las rebajas son una buena ocasión para hacerse con gangas que se puedan customizar, y yo me he hecho con dos camisetas básicas en gris marengo (ambas iguales) y voy a crear dos "diseños" con ellas, así ver un poco del gran potencial que tiene una prenda tan simple como ésta. Como me encantan los DIY con pinturas, el primero va a ser usando un poco de ésta además de otros elementos. ¿Empezamos?

MATERIALS/MATERIALES
- T-shirt / Camiseta- Cutter
- Template / Plantilla
- Acrylic paint / Pintura acrílica
- Sponge / Esponja
- Masking tape / Cinta de carrocero
- Thread and needle / Hilo y aguja
- Fringes ribbon / Tira de flecos de raso

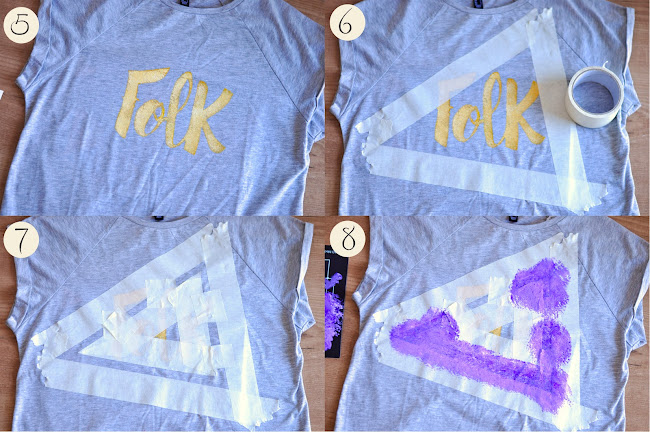
Draw, copy or print your template on a card. I've used the message "FOLK". Use a cutter to empty the spaces that are going to be printed over the tee. Affix the template to the T-shirt with some tape, the small pieces that go inside the letters can be attached to the fabric just making a small ball of tape and adding it to the back of the card. Put card or paper inside the T-shirt to protect the back of it. Create the mixture of acrylic paint you want and dampen a sponge on it. Press all over the template covering the empty spaces. Add some white colour to the mix of paint and use your sponge again to cover the template, but this time do it softer and not covering all the surface, just to add some light to the letters. The result is better if you use just a few paint, because the more paint to use, the more rigid that will become the fabric. Let it dry and remove the template.
Dibuja, copia o imprime la plantilla que quieras en una cartulina. Yo he usado el mensaje "FOLK". Usa un cutter para vaciar los espacios que van a ser impresos sobre la tela. Fija la plantilla a la camiseta con cinta adhesiva; las piezas más pequeñas que van dentro de las letras se pegan colocándoles una bolita o pliegue de cinta detrás. Para proteger la parte trasera de la camiseta, colocar cartulina, cartón o papel en su interior. Crea la mezcla de pintura acrílica deseada, empapa un poco la esponja y ve presionando suavemente encima de la plantilla hasta que las letras queden cubiertas. Añade pintura blanca a la mezcla, para suavizar el color, empapa la esponja y vuelve a pasarla por encima presionando muy suavemente, dejando ligeros toques de luz en las letras. El resultado es mucho mejor cuanto menos cantidad se pintura se use para rellenar la plantilla, ya que sino la tela queda muy rígida.Dejar secar y retirar la plantilla.

Now, create a triangle with masking tape (see the picture). First do the outer shape, and then the inside. My triangle is over the message, so the whole triangle is not going to be printed. Cover the parts of the triangle that are not going to be printed with more masking tape. With the sponge and more acrylic paint of a different colour, cover the inside of the triangle shape. Let it dry and remove the tape. To affix the paint to the fabric, iron it.
Ahora crea una triángulo con la cinta de carrocero sobre las letras (ver imagen). Empieza colocando lo que será el borde exterior y luego con cuidado se crea el contorno interior. Como el triangulo corta las letras, tapa aquellos trozos que no quieras pintar. Nuevamente prepara la mezcla de pintura que te guste y con la esponja empapa y presiona suavemente hasta tenerlo todo cubierto. Deja secar y retira la cinta con cuidado. Para fijar la pintura al tejido planchamos bien, ya que el calor ayuda a que ésta se adhiera a las fibras.

At the back of the top some fringes are going to be added. First of all, decide where you want to put them and mesure, if necessary, in case there has to be a symmetry. Affix it to the fabric with pins and sew it. I've done it by hand, but it can be done with the sewing machine or using fabric glue. And that's it. Your FOLK top is ready to wear!
En la parte trasera del top se van a añadir unos flecos. Primero decide donde colocarlos y mide si es necesario para que no haya ninguna asimetría. Fíjala la tira a la tela con alfileres y ve cosiéndolo. Yo lo he hecho a mano, pero se puede hacer a máquina o simplemente con pegamento para telas, que es más rápido.


8 comments
M. Jesús en serio estoy flipando contigo, vaya talento y creatividad que tienes amiga linda. Me ha encantado esta camiseta, quiero una para mí...
Besos
Mila
http://styleinlima.net/
Que bonita!
New look on my blog!
http://sweetmona.com/blog/2014/07/31/boho-chic/
wow, queda genial!!
besito
www.letiziabarcelona.com
Buena idea!! te quedo muy bien.
Saludos!
http://totociccia.blogspot.com/
que creatividad!! ha quedado muy bien!
http://chroma-in-crescendo.blogspot.com/
Great shirt :)
xx,
Marie
LivRiot | Fashion & StreetStyle Blog
LivRiot | Fashion & StreetStyle Blog
Hey very nice blog, I'll be visiting often.
I invite you to my blog : http://dreamofparadisebydomi.blogspot.com
maybe follow :)
I invite my Instagram and Facebook
http://instagram.com/dreamofparadisebydomi
www.facebook.com/dreaomofparadisebydomi
Kisses
nice outfit ♥
Check my blog YOKO NGUYEN BLOG
Post a Comment