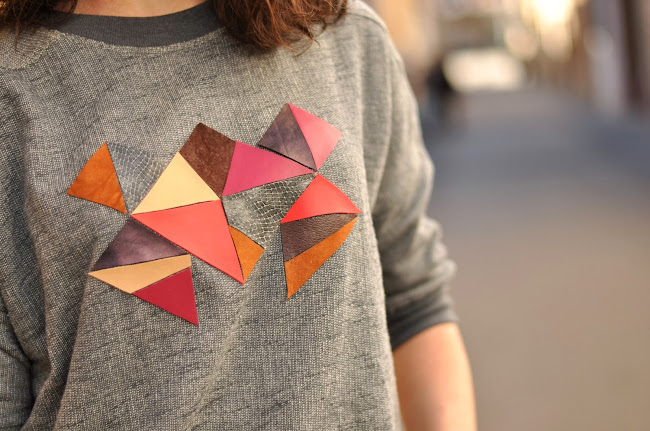
Last week I showed you in this look my last project, a DIY sweater with a figure of geometric shapes made of leather pieces. I felt inspired when I saw this sweater on Galliano's show and the idea of my own version came to mind. As promised, today you have the tutorial. It was the first time I used fabric glue and the experience has been so good, I'm going to repeat it soon. Let's start?
La semana pasada os enseñaba un look con mi último DIY, una sudadera con un panel de figuras geométricas de piel. La inspiración me vino cuando vi esta sudadera en un desfile de Galliano y la idea de mi propia versión se formó en mi mente, ideando ya desde un principio el tipo de colores y figuras que quería utilizar. Ha sido la primera vez que he usado pegamento textil, y la experiencia ha sido tan buena que pronto repetiré. ¿Empezamos?


MATERIALS/MATERIALES
- Simple plain sweater / Sudadera básica- Leather and PU pieces in different colours / Trozos de piel y polipiel de distintos colores
- Scissors / Tijeras
- Fabric glue / Pegamento textil
- Pins / Alfileres
- Template / Plantilla/)

You can print/create the template twice or just take a picture with the mobile to know how the pieces go once you start cutting all the figure. Cut the pieces of the template and fix each with a pin on the piece of leather/PU you want to do each, taking into account the combination of colours that will result. I've used some pieces of PU I bought and suede and leather from old footwear that I was keeping for future DIYs. Cut the leather pieces with the template. and, while you are cutting them, create over the table the figure to check if the mix of colours is what you were looking for.
La plantilla puedes imprimirla dos veces o simplemente hacerle una foto con el móvil para saber cómo van las piezas en la figura una vez las tengamos cortadas. Cortar la plantilla e ir enganchando con un alfiler cada una de las figuras geométricas en la pieza de piel/polipiel que queramos, teniendo en cuenta la combinación de colores resultante. Yo he usado algunos trozos de polipiel de colores que he comprado y restos reciclados de piel y antes de calzado viejo que voy guardando. Corta las piezas de piel con las plantillas que les hemos ido fijando y, mientras se van cortando, crea sobre la mesa la figura para comprobar y la mezcla de colores y tejidos es lo que ibas buscando.

Once it is all cut, place all the pieces on the sweater in the correct place and start glueing them, one by one, on the sweater following the glue instructions. When all of it is fixed to the sweater, leave it dry for some hours. Maybe you'll see that some of the borders are not completely glued to the fabric, so, using a toothpick to can add some glue to these parts.Et voilà!
Una vez está todo cortado, traslada la figura a la zona de la sudadera donde quieras ponerla y empieza a pegarlas, una a una, siguiendo las instrucciones del pegamento textil que tengas. Cuando todo esté pegado al suéter, dejalo secar unas horas. Quizás veas que algunas de las puntas y bordes no se han acabado de enganchar, así que con ayuda de un palillo, pon un poco más de pegamento en esas zonas...et voilà!
Nos encanta!Una gran idea... Queda genial! Muaks y Feliz Día...
ReplyDeleteQue idea más buena! A ti te ha quedado genial, no se sí me quedaría igual de bien, jeje. Un besito!
ReplyDeletehttp://thefashionbrook.blogspot.com.es
pero que mona!!!!
ReplyDeleteMe encanta la sudadera, te ha quedado chulísima, me encantan las piezas de colores. Quizá me anime a hacer algo parecido si tengo tiempo porque el resultado no puede ser mejor
ReplyDeletehttp://prettymeniso.blogspot.co.uk
buena idea!!
ReplyDeleteun poco de vidilla a una simples sudadera!
bien hecho!
besitos
Cátia
http://walktoclick.wordpress.com/2014/03/10/madrid-colorless/
Muy chulo!
ReplyDeleteBesos.
Gemeladas
¡Eres una artista! Me encanta el jersey :)
ReplyDeleteMe encanta el jersey y la idea. Que mano tienes querida... <3
ReplyDeleteVirginia.
www.nostranger.com
Que bonito te ha quedado!
ReplyDeleteQue lindo, que buena idea!
ReplyDeletehttp://fashionindahat.com/
very very beautiful creation, i love it!
ReplyDeletewww.agoprime.it